
[Version 0.3]
This is a WORK IN PROGRESS article with some ideas and workflows in ngSkinTools. I'll update it wiki-style, as I produce gifs or illustrations to show the steps. I'll also update it further after I've had a chance to test ngSkinTools 2. So far this covers version 1.
Introduction
ngSkinTools is an incredible tool for doing powerful skinning. If you aren't using it yet, I hope you'll give it a try. If you are, but feel like you aren't getting the most out of it, I'd like to give you some further ideas for working with it.
Most people likely start by focusing on ng's smoothing and relax features. And that's a great start! But let's go deeper!
I'll show you one quick example first, for anyone who needs convincing about the power of layers. Then I'll cover more tips and workflows.
Using layers and masks means that you can control the direction of your smoothing. Because:
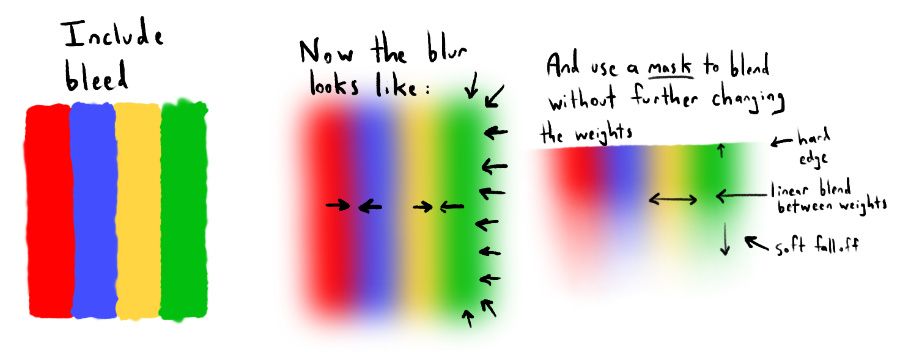
- You can include a bleed zone, like they do in comic printing, to get a nice crisp edge, for example.
- You can include only specific groups of joints that you want in each layer. For example, you have a layer that is just your upper lips. And smoothing inside that layer will not cause any bleed from your lower lips, jaw, cheeks, or anywhere else.
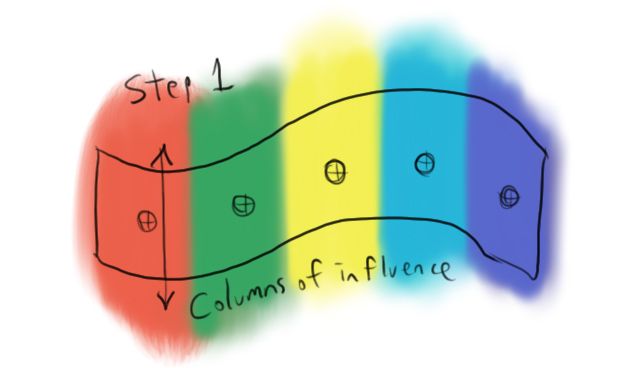
What does that mean? It means you could make it so it smooths horizontally, but not vertically. Here is what it can look like to include a bleed zone in your layers:
Step 1. You paint (or assign) your weights but you let the weights go far past where you want them.
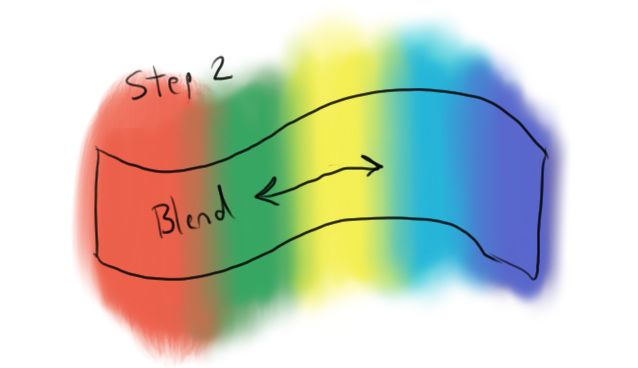
Step 2. When you smooth, the transparent edge is too far away from your target area. So the weights will only blend sideways.
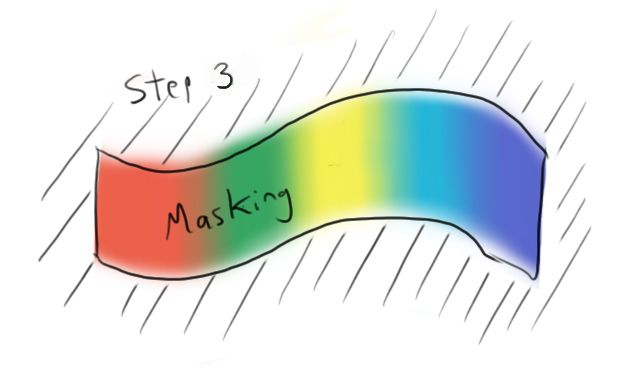
Step 3. Then you can paint a mask on that layer to limit the area.
Here I draw it again to explain in another way.
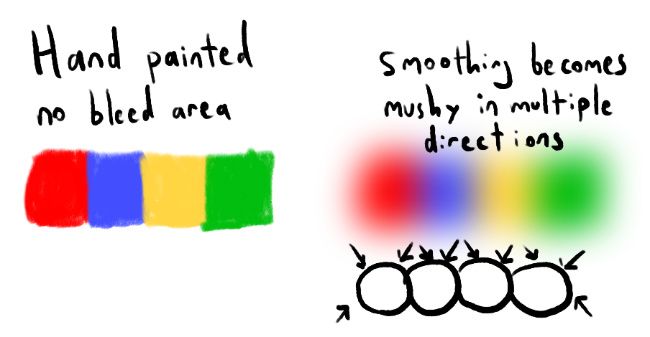
- Create a separate mask for a part of your rig. The lips for example.
- Paint or assign weights that extend out far past the lips.
- "Convert Transparency to Mask" (or you can just assign your own mask with a soft selection flood.)
- Cut away all the excess distance from the mask. The bleed remains on the lips.
- Smooth the lips influences a bit. Any smoothing you do now, will only affect how the lips blend between themselves. And the extra bleed distance will prevent any empty transparency from bleeding in.
- Finally, most of the painting you will need to do will just be to soften and smooth the transition on the mask. Complicated painting of individual lip influences should be minimal at this point.
What else can you do with ngSkinTools? A quick overview
- Paint weights using layers! This can be tricky to understand until you try it. But once you get the hang of it, you'll see, it is as powerful and flexible. It's like comparing painting in Photoshop vs. MS Paint. Can you make great art in Paint? Yes. Should you? No. (Unless that's your gimmick. But probably not if you are working on deadlines in production.)
- Does that mean you should always use layers? No not necessarily. Some people don't care so much about layers. And sometimes you don't really need them. But you have them available to you. You can always use a temporary layer to do a powerful edit, and then delete the layers. You can consider it a temporary workbench where you can isolate specific joints and specific geometry.
- It has powerful Relax and smooth algorithms which smooth all of your influences at once. This is how Softimage XSI used to work, and it makes smoothing incredibly fast and predictable. When you combine this with layers, you can control exactly which influences smooth with which influences. (Without unrelated influences bleeding in their results. So you can smooth without your weights getting muddy.)
- Check "Use soft selection" and "Native soft selection" in the Relax tool, the Assign Weights tool, and Unify Weights tool. It means when you turn soft selection on in Maya, NG will respect and use that selection. It's a great way to do localized smoothing or assigning. BUT you can also edit the falloff curve in your Maya tool settings, to get a bunch of useful effects. - For example, you can set it to linear to get a perfectly linear flood, or a nice sharp fast-in-ease-out C shape.– You can reverse the curve, and flood in reverse. It's a rare need, but it comes in handy.
- You can Cut, Copy, and Paste weights from one influence to another, or from one layer to another. And that respects your selection or soft selection too! So if you just want to cut and paste weights from 3 vertices in the upper eyelid, no problem! This makes it extremely easy to make complicated skinning fixes.
- Each layer has a mask. And you can Cut, Copy, and Paste the mask as well. Furthermore, you can copy a mask to a joint influence, or an influence to a mask on any layer you want.
- You can also Paste (Subtract). Which means you can take the shape of one influence's weights, and carve into the shape of another influence. With all of these Cut, Copy, Paste, and Paste Subtract options, you can do some very powerful boolean-like operations on your weights. Allowing you to make fast edits with surgical-like precision!
- You can export your weights with layers as an external .json file. This is useful for backing up, or transferring weights from character to character.
- You can transfer weights (and layers) between geo using vertex number or by closest point in space.
- You can turn OFF specific layers. So for example, you could turn off your eyelid layer, and make a version 2, and then compare which one you like better. This makes it easy to experiment and test, without losing any previous work.
- There is a feature that can "Distribute removed weights". So as you subtract, it will assign weights to the other joints. Maya does this by default. But the reason this is more powerful than Maya, is because it will only assign to the assigned weights in your current layer. So if you are subtracting weights from your lips, it will only replace it with other lips joints, without causing bleed from your cheeks or jaw.
– And the reason this is an option is because sometimes you don't want this automatic reassigning. When turned off, subtracting will just directly cut transparency into the layer, revealing the weights below. I can't stress enough how powerful this makes it for precision editing in delicate areas like facial rigs. (I use both options often.) - It has a sharpen brush. This is just the opposite of smoothing. If a weight is closer to one joint, sharpen will make it move closer to 100% of that weight. I don't use this very often. But sometimes it is handy in an elbow or knuckle, to tighten up a corner.
First steps and settings
- Turn OFF maintain max influences. In my opinion, Maya should never do this for you. The reason? Maya will take away from your smallest weights, which are usually your most delicate weights used for a smooth result. What you actually want to remove is your least-used weights, in terms of posing/deformation.
- (For example, in your shoulder area, let's say you had chest+neck+clavicle+4 arm joints, and you wanted to get down to 4 influences. What you would probably want to do is copy the influence from arm2, arm3 and arm4 to arm1 because those would be the least-contributing influences. What you wouldn't want to do is remove the soft blending you painted on your clavicle. But that is exactly where Maya would prune your weights, and then you'd end up with little jagged edges where your arm is moving your clavicle area.)– Anyway, that's a big topic to discuss. But ngSkinTool's max influences is non-desctructive. So you can see the result, and continue editing your weights to get the final result you want. You have much more control.
- Start with these skin settings as a good default in Maya:
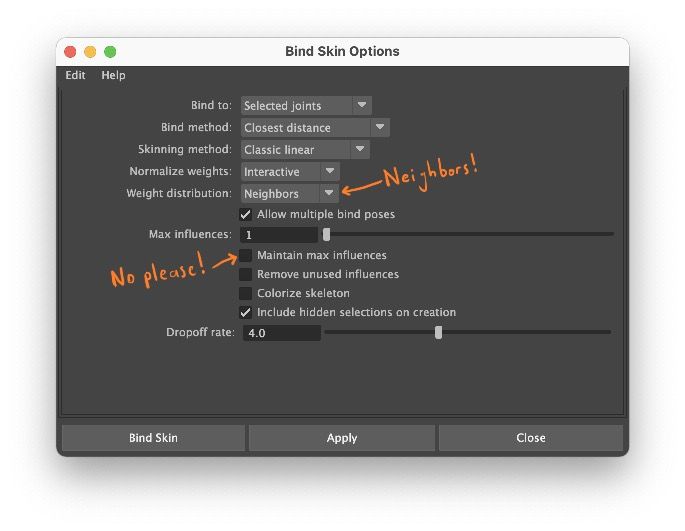
- Bind to: Selected joints
- Bind method: Closest distance
- Skinning method: Classic linear
- Normalize weights: Interactive
- Weight distribution: Neighbors (don't use Distance. That is an old algorithm. Neighbors fixes a lot of problems with exploding random weights that Maya used to suffer from.)
- Max influences: 1 (We will be assigning and smoothing weights later in NG. Using 1 will give you the most clean and predictable starting point without Maya trying to do any of its own weird blending.)
- Maintain max influences: OFF!!!!!! No! Unchecked! False! Do not use this.
- Remove unused influences: OFF. This will cause Maya to automatically remove any joint which didn't happen to get any influence. You don't want this to happen.
- Include hidden selections on creation: Checked. Otherwise, if you have something hidden, it might not get added to the skinCluster, and you might not notice right away.
Troubleshooting and gotchas
- First of all, make sure when using ngSkinTools that you don't use any standard Maya skinning tools or editing. You will be allowed to make your edits, and you will even see your edits. But as soon as you touch the ngSkin layers again, NG will overwrite your changes. If you need to use standard Maya tools, you need to delete your ngSkin layers first.
- Make sure your bottom layer has 100% opacity. If your weights have any transparency, your weights may not normalize to 1.0. It will be exactly like if you are painting in Photoshop, but have a hole down in your background color. So have a "safety layer" at the bottom of NG that has 100% weights and no mask falloff. On your upper layers, you are free to edit and subtract weights, but your safety layer will always mean your weights add up to 1.0.
- If you set "Use maximum influences" in ngSkinTools, be aware, when you export your layers to a .json file and import them again, those settings are not saved. You have to turn it back on. Remember that "Use maximum influences" in ngSkinTools is non-destructive. So "pruning" won't change the weights in your layers, only the final result in the skinCluster. (Which is great!)
ngSkinTools tips
- When you use the "Assign Weights from Closest Joint", it uses all the joints you have selected in the ngSkin UI. (Maya on the other hand, skips end joints, and won't include them in the weights for some reason.) So it makes it very easy to make a layer for the arm, and assign weights to just the arm in that layer.
- Understand the difference between volume and surface. In the Relax tool, you have "Associate by Volume" and that means the smoothing will use space, and smooth between vertices that are on separate poly islands. Which be handy, or unwanted. The results are very different.
- Likewise, on Unify Weights, there is "Ignore separate shells or selection gaps". This will give you very different results as well. If you have Ignore turned on, then it will sort of treat separate poly islands as one piece.
- ==What is Unify Weights? Explain it with some examples.==
- Two very important tools for this are Edit -> "Convert Mask to Transparency" and "Convert Transparency to Mask".
- Use poly planes or other clean shapes of geo to copy specific layers into your geo.
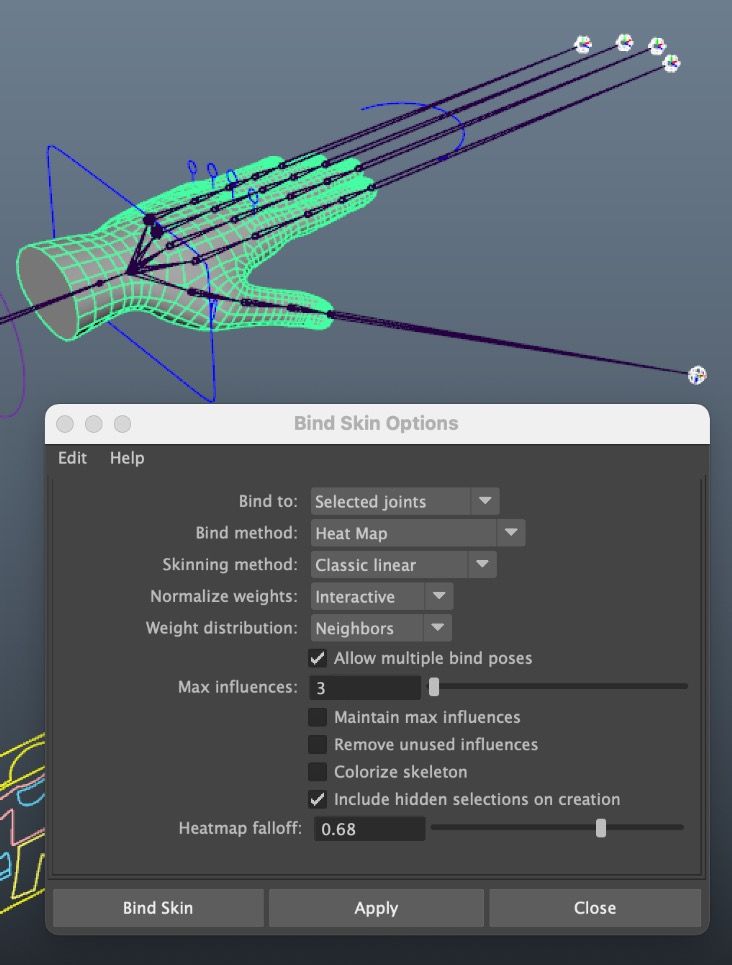
– ==List the steps to use shells== - Combine different types of skinning - For example, I use heat weights on my fingers/hands. I duplicate my hand geo, use heat weights, and then copy that back in as a layer on my full geo.
– This isn't related to ngSkinTools, but I add fake tip joints so Maya won't skip the end knuckles.– Outline the settings I use:–
- Use empty layers as a temporary work bench. You can make an empty layer, and paint a mask as a sort of temporary buffer. Or copy the influences from 2 joints to combine them, and then use that as a mask for another layer.
- Make an empty layer and name it with a comment/note for your progress. For example "2021-04-12 Skinned the lips". Or "TODO: Fix the button weights on the jacket."
Other Ideas:
- Using a cylinder or plane to generate well-blended masks (skirts)
- The importance of bleed-edge and under-painting (examples: Clavicle and face areas like jaw and muzzle)
- Show some of my actual masks and patterns on characters and props.
- Illustrate some recipes by using gifs
- How I duplicate shells to copy flat weights back to objects like buttons.
- How I use a shell to copy to multiple layers. For example, copying to upper lips and lower lips, so the weights match. And then focus on painting the masks. You can assign weights in the influences list. But how sometimes it is cleaner to copy in a shell layer from a poly plane.